How do you screenshot on a Macbook? To take a screenshot on Mac laptop or computer is not as hard as other people think. In fact, there are several ways to do so. Taking a screenshot of the screen is important because it allows people to see what is happening on their screens. It will then help them show to others what they want others to see. Furthermore, iff there is an unfamiliar message suddenly appeared, it will be easy for them to show it to expert. Furthermore, it lets people explain the things that are hard to express by words of mouth. Below are the 5 free ways to screenshot on Mac.
1. Using the Keyboard –Default Way
There are 4 ways on how to screenshot using the keyboard of the Mac computer. Continue reading to learn them.
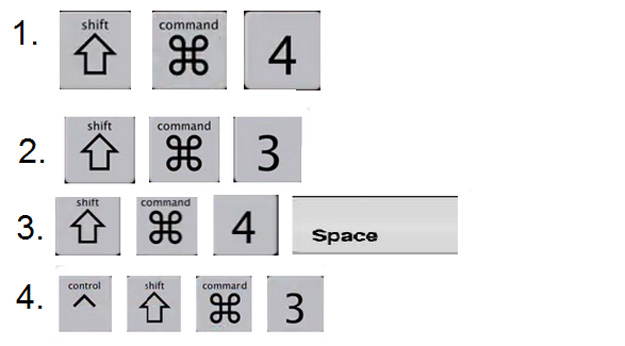
1. Screenshot a part of the screen- to screenshot a portion of the Mac computer screen, just press on the combination of “Command + Shift + 4” keys. After pressing those combined keys, the cursor will turn into cross-like cursor. When this happen, drag an area of the screen you want to capture using the mouse. Then let go of it when a gray colored rectangle appeared on the area you drag to take a screenshot. Screenshot taken will be saved on the desktop area.
2. Screenshot the entire screen- in case you want to capture the entire Mac screen, simply press on “Command + Shift + 3” key combination. After it, a camera shutter tone will be heard which indicates that a screenshot is taken. Just like the first one, the screenshot will be saved on the desktop area of the computer.
3. Screenshot an open window- to screenshot a single open window, press the combination of “Command + Shift + 4 + Spacebar”. Next, click on the window you want to capture to make a screenshot. The image will also be saved on the desktop.
4. Screenshot the screen and save an image on the Clipboard- if you think you need to take a screenshot but you want to edit it first before saving, you can copy it first on the Clipboard by pressing the combination of “Command + Control + Shift + 3” keys. Next, open the default image editing program of Mac and then use the “Command + V” shortcut keys to paste the image on the editor. Finally, save the image by clicking on the disc icon found on the interface of the editing tool.
2. Screenshot Using the Grab Application under Utilities
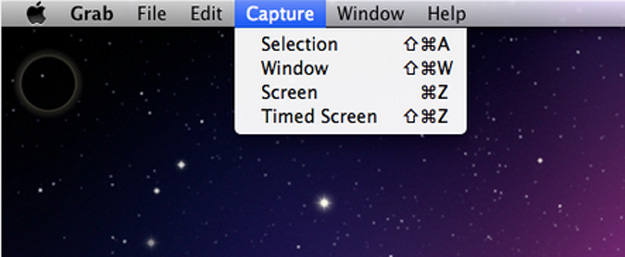
There is a Grab application available on Mac PCs under Utilities to save screenshot Mac. To use it, go to “Application”, choose “Utilities” and click on “Grab” to open the application. Note that you will only find the menus on the upper left part of the screen. From there, click on the “Capture” tab and choose whether to screenshot the full screen, a part of the screen, or a single window. Once the screenshot is done, a new window will open, click on “Save” to save the image on the computer.
3. Screenshot Using Free Online Screenshot
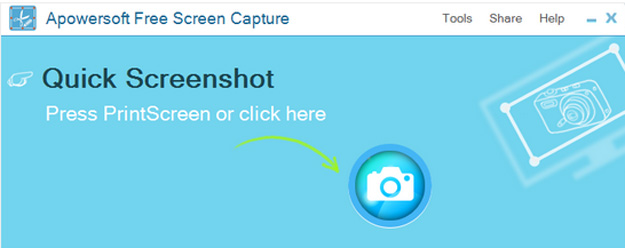
If in case you’re a bit confused in using the first 2 methods, you can make use of a Free Online Screenshot to make a screenshot in Mac. This tool needs a Java plug-in to run. It is an easy-to-use tool because you can capture anything on the screen by just clicking on the camera icon found on the interface of the tool. What is good about this online tool is that it has a built in editing tool which appears together with the image after taking a screenshot. Furthermore, it as well lets users to upload the image on the free and protected Cloud storage provided by the site. It as well allows them to share the screenshot taken directly on some social media sites like Google+, Facebook, Twitter, and more by clicking on the share icon found on the editing tool.
To how to make a screenshot on a Mac using this free online tool, follow the steps below:
1. Visit screenshot.net page.
2. Click on “Take Screenshot” tab, run the application, and wait for the tool to appear on your screen.
3. Set the screen of the computer on the part you want to capture.
4. Click on the camera icon to capture an image.
5. Drag an area on the part of the screen you want to capture and then release the mouse.
6. Edit the image according to your needs.
7. Upload the image on the free Cloud storage by clicking on the upload icon found on the editing tool or just simply save it in your PC if you want to.
4. Make Webshot Using Webpage Screenshot Capture
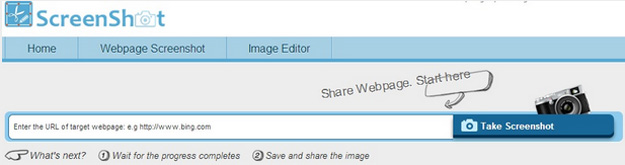
Another free online tool is Webpage Screenshot Capture tool. This one is different to Free Online Screenshot tool because this one only captures webpages. In case you are about to capture a webpage, this tool is perfect for you as it will give you a high quality image by simply doing the Copy-Paste method. Moreover, it also lets users upload and share the images online and it also has an online editing tool allowing users to add texts, lines, highlights and more.
To use this tool, follow the steps provided:
1. Go to screenshot.net and navigate to Webpage Screenshot page.
2. Copy the link of the web you want to capture.
3. Paste the link on the URL box found on the page.
4. Click on “Take Screenshot” button to screenshot the webpage.
5. The image will automatically be uploaded on the site. Decide whether to share it directly on social media sites or to edit it first using the online editing tool.
5. Screenshot Using a Desktop Tool
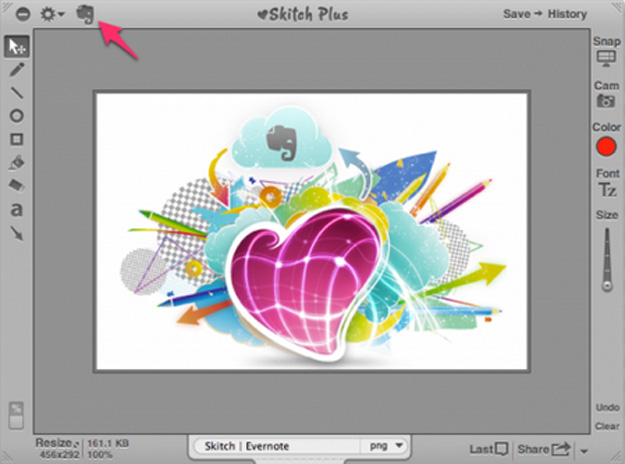
Aside from using free online tools, you can also make use of desktop tools to take a screenshot easily offline. Skitch is one of the desktop tools compatible to Mac PC. Using this tool, users can as well capture a portion, or the entire screen of the Macbook. Additionally, users can also add texts, draw, resize and rotate the screenshot. This tool just needs to be installed in your PC to be able to use it.
Those are the free different ways to screenshot on a Mac computer or laptop. All those 5 ways are helpful but only few can do all the features needed by the users. The Free Online Screenshot tool is jump-packed with features which are indeed the perfect tool for everybody- capturing, editing, sharing and uploading.

